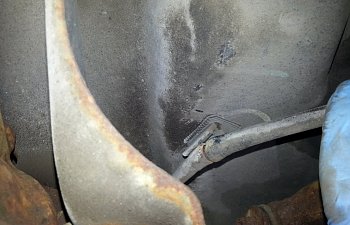
Here's my step by step guide to fitting parking brake cables. You can see in the pictures that both of the outer sheathes of the cables had completely split in half.
Whilst this isn't a reason to fail the M.O.T. it is sensible to change them as water can get in and the corrosion of the wire cables starts leading,eventually, to failure(snapping).
REMOVAL.
Step 1. Jack up the rear of the car and support it on axle stands or blocks. Remove the wheels.
Step 2. Remove the 2 16mm bolts which hold the calliper carrier to the hub and place the caliper between the shocker and the spring to reduce stretch on the brake hose. Then you can take out the screw which holds the disc to the hub and place the disc to one side. If you cant get the disc off you may need to slacken the adjuster between the hand brake shoes with a small screw driver through one of the wheel bolt holes.

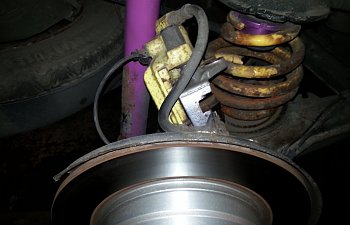
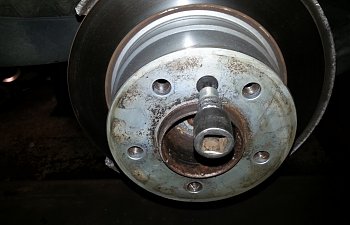
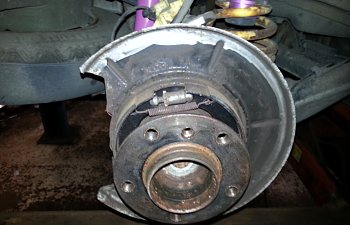
Step 3. Inside the car lift up the handbrake lever gaiter ( at the rear end first ) and you will see 2 9mm lock nuts and 2 14mm adjusting nuts on the end of the 2 cables. Hold the 14mm nut with a spanner and loosen the 9mm lock nut and remove from the threaded section, repeat for other cable. Slacken the adjusting nuts up to the end of the thread and leave in place.

Step 4. Remove the 2 hold down springs which hold the hand brake shoes to the back plate with a 5mm allen key( push and turn through 90 degrees). Spread the shoes and remove the adjuster and springs and the shoes from the expander to which the cables are attached.

Step 5. As you pull the expander out of the recess it will hinge open exposing the cable eye and the very small pin which connects the two parts. BE CAREFUL not to lose this pin.


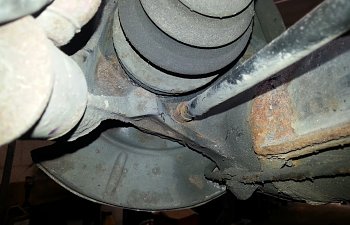
Step 6. Grip the outer cable on the inside of the rear hub and work it up and down side to side till it frees up enough to pull it clear of the hub (see picture) Repeat for other side cable.
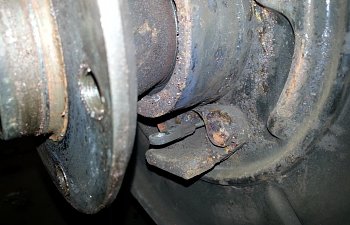

Step 7. Remove the 2x 14mm nuts from the cables inside the car being careful to retrieve the double washer/plate which goes over the 2 cable threaded sections. Then from under the car you can pull the cables out of the steel sleeves in the car floor.

Step 8. Check your new cables,(a) that the double washer fits snugly over the threaded sections where they are machined flat (mine didn't and had to be filed out a little) and (b) that they fit into the holes through the hubs (again mine didn't and had to be drilled out, which left them slightly over big so I applied some silicone sealant before fitting into the holes to prevent any rattles).

INSTALLATION
Step 9. Push the new cables up through the sleeves in the floor and through the guides on the lever itself, it's best to have the handbrake lever down to the floor for this, and the fit the double washer over the threaded sections and fit the 2 14mm nuts level to the end of the thread.
Step 10. Apply some silicon to the outer sleeves before fitting into the hubs if required. Re-fit the expanders shoes and springs in the reverse order of removal. Taking care to lubricate the pin in the cable "eye" and the expander itself to ensure trouble free use.
Step 11. Re-fit the disc to the hub ensuring that the brake shoe mating surface is clean and smooth. Now adjust the parking brake shoes until you can't turn the disc, gently tap around the hub of the disc with a hammer (being very careful not to hit the brake surface) and try to adjust up some more. If the adjuster is as tight as it will go (don't force it) slacken the adjuster 5 "clicks" and repeat for the other side. Adjust both cables in the car until you have 5-6 clicks on the ratchet of the handbrake lever. Re-fit the 9mm lock nuts and tighten down to the adjuster nuts and lock together with 2 spanners. Re-fit lever gaiter.
Step 12. Re-fit the callipers to the hubs ensuring the hoses are NOT twisted and tighten the 2 16mm bolts. Next make sure that the cables are mounted in the clips on the car floor( 2 each side ).
Whilst I was doing this job I took the time to fit the wheel spacers recently acquired in the USA. All is needed is to ensure that the mating surfaces of the wheels and discs are clean and flat and, of course, that all the holes line up properly.
Re-fit the road wheels and torque up to the correct figure, lower car off the stands and road test.
Additional Images Showing underneath of car


Whilst this isn't a reason to fail the M.O.T. it is sensible to change them as water can get in and the corrosion of the wire cables starts leading,eventually, to failure(snapping).
REMOVAL.
Step 1. Jack up the rear of the car and support it on axle stands or blocks. Remove the wheels.
Step 2. Remove the 2 16mm bolts which hold the calliper carrier to the hub and place the caliper between the shocker and the spring to reduce stretch on the brake hose. Then you can take out the screw which holds the disc to the hub and place the disc to one side. If you cant get the disc off you may need to slacken the adjuster between the hand brake shoes with a small screw driver through one of the wheel bolt holes.


Step 3. Inside the car lift up the handbrake lever gaiter ( at the rear end first ) and you will see 2 9mm lock nuts and 2 14mm adjusting nuts on the end of the 2 cables. Hold the 14mm nut with a spanner and loosen the 9mm lock nut and remove from the threaded section, repeat for other cable. Slacken the adjusting nuts up to the end of the thread and leave in place.

Step 4. Remove the 2 hold down springs which hold the hand brake shoes to the back plate with a 5mm allen key( push and turn through 90 degrees). Spread the shoes and remove the adjuster and springs and the shoes from the expander to which the cables are attached.
Step 5. As you pull the expander out of the recess it will hinge open exposing the cable eye and the very small pin which connects the two parts. BE CAREFUL not to lose this pin.
Step 6. Grip the outer cable on the inside of the rear hub and work it up and down side to side till it frees up enough to pull it clear of the hub (see picture) Repeat for other side cable.


Step 7. Remove the 2x 14mm nuts from the cables inside the car being careful to retrieve the double washer/plate which goes over the 2 cable threaded sections. Then from under the car you can pull the cables out of the steel sleeves in the car floor.

Step 8. Check your new cables,(a) that the double washer fits snugly over the threaded sections where they are machined flat (mine didn't and had to be filed out a little) and (b) that they fit into the holes through the hubs (again mine didn't and had to be drilled out, which left them slightly over big so I applied some silicone sealant before fitting into the holes to prevent any rattles).

INSTALLATION
Step 9. Push the new cables up through the sleeves in the floor and through the guides on the lever itself, it's best to have the handbrake lever down to the floor for this, and the fit the double washer over the threaded sections and fit the 2 14mm nuts level to the end of the thread.
Step 10. Apply some silicon to the outer sleeves before fitting into the hubs if required. Re-fit the expanders shoes and springs in the reverse order of removal. Taking care to lubricate the pin in the cable "eye" and the expander itself to ensure trouble free use.
Step 11. Re-fit the disc to the hub ensuring that the brake shoe mating surface is clean and smooth. Now adjust the parking brake shoes until you can't turn the disc, gently tap around the hub of the disc with a hammer (being very careful not to hit the brake surface) and try to adjust up some more. If the adjuster is as tight as it will go (don't force it) slacken the adjuster 5 "clicks" and repeat for the other side. Adjust both cables in the car until you have 5-6 clicks on the ratchet of the handbrake lever. Re-fit the 9mm lock nuts and tighten down to the adjuster nuts and lock together with 2 spanners. Re-fit lever gaiter.
Step 12. Re-fit the callipers to the hubs ensuring the hoses are NOT twisted and tighten the 2 16mm bolts. Next make sure that the cables are mounted in the clips on the car floor( 2 each side ).
Whilst I was doing this job I took the time to fit the wheel spacers recently acquired in the USA. All is needed is to ensure that the mating surfaces of the wheels and discs are clean and flat and, of course, that all the holes line up properly.
Re-fit the road wheels and torque up to the correct figure, lower car off the stands and road test.
Additional Images Showing underneath of car


