Time for an overhaul of my 1.9 '98 BMW Z3 Individual

Matt Barnes

Zorg Guru (III)
Supporter
British Zeds
Joined
Jul 18, 2020
Points
128
Location
Portchester, Fareham
Model of Z
1998 BMW Z3 Individual 1.9 M44 B19
right.... another weekend, more garage time....... well for starters the Peugeot passed it's MoT.... so that's one less worry

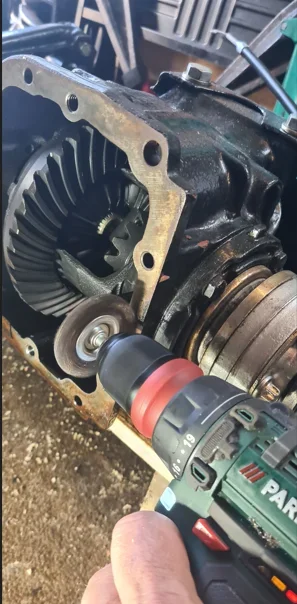
right..... *rubs hands*...... driveshafts.... :party:

Started off with brake cleaner and a small screwdriver to clean the grooves out.... then a liberal coating of copper grease

1751122146125.png
1751122195108.png


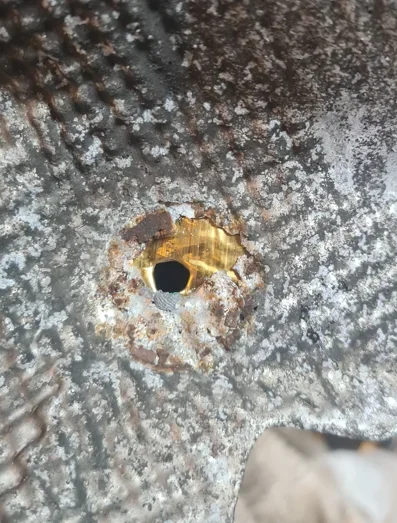
Those of you that remember the nightmare of me trying to get the driveshafts out 2 years ago !..... well it was time to revisit my nemesis.

The damage is the result of me heating, hammering with a punch; hammering with a cold chisel; punching it; kicking it; swearing at it...doing everything to get the nut off as I had rounded it off... eventually I managed to drill it into several bits with a Dremel carbide bit.

1751122433065.png
1751122493483.png


You may think that's too far gone and I should just by a new hub......... but... oh no... this won't defeat me...

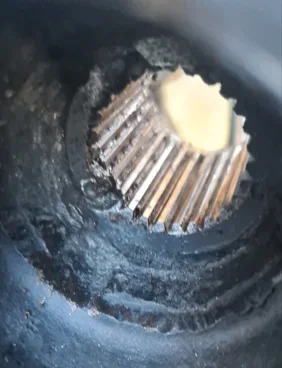
knocked the high spots off with a Dremel rough drum

1751122540250.png
1751122560486.png


that took care of the proud bits of "mushrooming" metal... now for the grooves

for this I used a carbide bit on the Dremel, to drill out the grooves..

1751122652403.png


started out like a WWI crater in the Somme

1751122697246.png


but with the Dremel bit... I ended up forming new grooves

1751122761437.png
1751122735055.png


and to my eternal relief.... they're both in !!!.... nuts are only there so as not to lose them... yes I have the anti rattle washers so will put those on an torque up another day

1751122882656.png


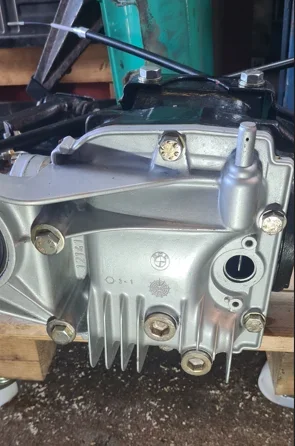
but here we are ... all back together with zinc plated bolts and brackets

1751122940226.png


1751122960465.png


apologies for the sawdust..... had to make more modifications to the trolley !! :whistle::whistle:

1751122988843.png


1751123008304.png
1751123056745.png
 

Attachments

Mazza

Zorg Guru (V)
Supporter
British Zeds
The M44 Massive
Joined
Nov 1, 2017
Points
175
Location
Bognor Regis
Model of Z
Z3 1.9 M44 Roadster Z3 2.8 Project
Mines drivable … just not legal :whistle::whistle:=))=))=))=))=))
 

Mazza

Zorg Guru (V)
Supporter
British Zeds
The M44 Massive
Joined
Nov 1, 2017
Points
175
Location
Bognor Regis
Model of Z
Z3 1.9 M44 Roadster Z3 2.8 Project
There are only four things that keep me going …. Z3’s , Music, Fishing and Women …. and at my age Fishing and Women tie for first place =)) =)) =)) =)) =))
 

Matt Barnes

Zorg Guru (III)
Supporter
British Zeds
Joined
Jul 18, 2020
Points
128
Location
Portchester, Fareham
Model of Z
1998 BMW Z3 Individual 1.9 M44 B19
Not much Z3 action today, more of a parts ordering session.. hoses, clips, very unsexy stuff.... but... that doesn't mean you have to miss out.... thought I'd test fit the new shiny discs.... and plop on the new springs and spring pads..

first things first.... parts !.... ordered new brake hoses and was sifting through the sensors I pulled and had this little bundle on the bench....

1751722533050.png


Everything accounted for apart...... the blue connector one.... WHERE THE HELL DOES THAT GO !!!?.... looked for what must have been 20 minutes.... then it dawned on me......... it's off the Peugeot... :whistle: :whistle: :whistle:

right...... sanity back...

thought I'd offer up the new discs and it was a good thing I did....... my Faux pas with the trolley and the rear end falling off, meant to backplates had been shall we say "re profiled"...... disc wouldn't go on... so I had to fettle the backplate with wide grip pliers, fingers and a wooden mallet.... but... we're there...

1751722777488.png
1751722795648.png
1751722815407.png


The other thing that made me hit my head against the wall was, I was checking the connector brackets for the ABS and pad wear sensors. Had to look at old pictures first to remind which one went where.... when I started cleaning them up... there's a great big "L" and "R printed on them ! :whistle:=))

1751723132755.png


next steps are.. LOWER THE CAR !!.... EEEEK !... time to lower it a bit in order to get the heatshields back in, then the tank, then the subframe !... then a simple job of connecting it all back up... =))=))
 

Matt Barnes

Zorg Guru (III)
Supporter
British Zeds
Joined
Jul 18, 2020
Points
128
Location
Portchester, Fareham
Model of Z
1998 BMW Z3 Individual 1.9 M44 B19
Not much Z3 action today as it's 34 degrees in the garden and little less in the garage. The Garden Geko never lies !

1752415192510.png


anyway.... thought I'd carry on emptying boxes by putting more parts on the car.....dug out Brembo brake hoses and new ABS sensors, plus a nice crisp diff gasket...

1752414571062.png


Cleaned up the surfaces on the diff and the plate.... quick go over with a wire wheel

1752413745981.png
1752413815410.png


Then I considered calling a mental health first aider... as I couldn't figure out why the holes weren't lining up, and that there were more holes in the Diff than in the gasket o_O o_O :whistle:

1752413926173.png
1752413946142.png


Given there are only 6 bolts but 10 holes, left me questioning the origins of the universe.......I tried not to think too deeply about it and just filled the holes with the bolts I have !!

As usual for me now, added a touch of Optimol thread paste

1752414160550.png


et voila... and as @Mazza learnt, I went in dry with the gasket, but I haven't torqued anything up yet just in case I've got it horribly wrong....

1752414266037.png


After that it was installing the new Brembo brake hoses. Again only finger tight for now

1752414338262.png
1752414359188.png


Next steps, are confirming I haven't cocked something up; then torque everything down on the entire subframe; install cable clips and the two new ABS sensors..... but before that..... Gin ! 🍸🍸🍸🥃
 

Attachments

Last edited:

Matt Barnes

Zorg Guru (III)
Supporter
British Zeds
Joined
Jul 18, 2020
Points
128
Location
Portchester, Fareham
Model of Z
1998 BMW Z3 Individual 1.9 M44 B19
I know I keep putting it off.... but I think we need to......torque.... =)) =))

So, armed with the Torque specs courtesy of @Mazza it was time to get started....

I know the Diff bolts should be 83Nm, but I bottled it through my inherent fear of snapping bolts. I chickened out at 63Nm... so for each bolt torqued, I marked with a dot then wrote what I got to on each piece.

1752934908904.png
1752934931996.png


So Trailing Arm bolts at 67Nm. Diff backplate I went for 42Nm

1752935007322.png


Then I got the stabiliser Bar bushes out ... and rolling back the years I thought "that's never going to fit in there love !".... :whistle:

1752935128991.png


But it's amazing what a bit of silicone spray and a nudge from a vice can do !!

1752935183411.png
1752935201378.png
1752935228464.png


Then it all went a little pear shaped....

1752935328066.png
1752935366433.png
1752935391920.png


yes, my modified trolley collapsed .... again...

so after finding some creative new words to add to my rebuild lexicon.... I had to admit defeat and take the blocks off and return it to stock...

Now if you ever get asked the eternal question, "can you lift up an entire rear end on your own ?".. the answer is .......

1752935544607.png


........................Yes...... but I wouldn't recommend it..... and I might have done something to one of my biceps....but I'll find out in the morning !... I think I also dented one of the brake pipes but I'll have a look another time...

I think I'm all torqued apart from the brackets for the Stabiliser bar and the calipers, as obviously I need to put the discs back on.
 

Matt Barnes

Zorg Guru (III)
Supporter
British Zeds
Joined
Jul 18, 2020
Points
128
Location
Portchester, Fareham
Model of Z
1998 BMW Z3 Individual 1.9 M44 B19
I'm aching like I've gone 10 seconds with Oleksandr Usyk today, so no heavy lifting for me...They say "don't sweat the small stuff", but with car restorations you have to...

The parts tubs are getting lighter and emptier as stuff gets put back on the car... so I thought I'd check the body panel Hex screws...and it's fair to say some are beyond bringing back.....

1753020377679.png


so it was a quick inventory check of what's good and can be re-used and what's bad and needs to go

1753020445893.png


which then got me curious.... as when I go onto RealOEM, both the sill Hex screws and Body panel Hex screws have the same numbers, even though they are listed as different numbers on the diagram... both 4 and 8 are........

1753020963950.png


Hex head screwST4,8X16-ZNS3X07119901299


which is odd, as although both are M8, they are clearly different

1753020633981.png


I've made the dangerous assumption that the smaller washer is for the outer sills and the larger is for the body panels.. just doesn't make sense they're the same part number... UNLESS !.... someone's been there before and introduced some rogues ! .. but I have 16 of the larger ones and 33 of the smaller.......odd.
 

ChrisD

Zorg Addict
Joined
Nov 29, 2023
Points
54
Location
Evesham
Model of Z
M44
I'm aching like I've gone 10 seconds with Oleksandr Usyk today, so no heavy lifting for me...They say "don't sweat the small stuff", but with car restorations you have to...

The parts tubs are getting lighter and emptier as stuff gets put back on the car... so I thought I'd check the body panel Hex screws...and it's fair to say some are beyond bringing back.....

View attachment 342775

so it was a quick inventory check of what's good and can be re-used and what's bad and needs to go

View attachment 342777

which then got me curious.... as when I go onto RealOEM, both the sill Hex screws and Body panel Hex screws have the same numbers, even though they are listed as different numbers on the diagram... both 4 and 8 are........

View attachment 342781

Hex head screwST4,8X16-ZNS3X07119901299


which is odd, as although both are M8, they are clearly different

View attachment 342779

I've made the dangerous assumption that the smaller washer is for the outer sills and the larger is for the body panels.. just doesn't make sense they're the same part number... UNLESS !.... someone's been there before and introduced some rogues ! .. but I have 16 of the larger ones and 33 of the smaller.......odd.
The outer sills use both the large and small washer:
IMG_6447.jpeg

I know for certain that these ones have never been off the car.
I think you need a better source of what goes where than that shown in RealOEM.
 

Matt Barnes

Zorg Guru (III)
Supporter
British Zeds
Joined
Jul 18, 2020
Points
128
Location
Portchester, Fareham
Model of Z
1998 BMW Z3 Individual 1.9 M44 B19
ok not much progress this weekend ... mainly due to BBQs and alcohol... :whistle: :whistle:

however, to get over my "I can't get my jack under my trolley dilemma".... I bought another one.... slimline version....which was going to solve aaaaaall my problems of course...old jack v new jack.... ok so now it fits under......

1753621685442.png
1753621765561.png


which is great until you jack the table up and the whole thing turns into a very heavy seesaw...so me being me... made up a little wooden support that I could attach to the jack

1753621918676.png


so I fixed it to the jack.... which meant it would no longer fit under the trolley.... excellent.... =))=))=)):whistle:

whilst I think of another solution, I thought I'd attach the anti roll bar............ and something isn't right now is it..

1753622043940.png
1753622064040.png
1753622088373.png


it could be that these straighten out when the weight of the car is pushing down..... but at the moment it just doesn't feel right... I don't recall them being "handed".
 

Matt Barnes

Zorg Guru (III)
Supporter
British Zeds
Joined
Jul 18, 2020
Points
128
Location
Portchester, Fareham
Model of Z
1998 BMW Z3 Individual 1.9 M44 B19
another weekend of only managing bits and pieces on the car but...... I think the following is a valid test ?.... thought I'd quickly try and test my brake flares. Thought I'd tighten up the brake lines on one of the hoses until it bottoms out but not overtightening. Offside Trailing Arm was rock solid, nearside though, with the union bottomed out, I could still wiggle the pipe, which means to me to flare is too shallow. :whistle:

1754142575244.png
1754142597370.png
1754142623456.png


luckily, I made the pipes slightly long in case I had to remake the flares. Is there a better way to test how good the unions are other than trying them on a hose ?.... I don't have a compressor....
 

FLZ_Boy

Regular Member
American Zeds
Joined
Mar 19, 2025
Points
13
Location
Texas
Model of Z
Z3 1.9L
For your swaybar endlinks that looks canted, I have this same problem when I replaced mine (Meyle). I drove around with the new end links and the passenger side endlink wants to come off the swaybar (it's barely attached to the swaybar).

I examined the old OEM endlink, I can see (overtime) the endlink bushing (the hole that the swaybar goes through) deformed into an offset.

I suspect the new endlink bushings need to deform to get the correct angles you need. The bushing where the swaybar end goes through is the one that needs to have the greatest deformation to lineup properly.
 

Matt Barnes

Zorg Guru (III)
Supporter
British Zeds
Joined
Jul 18, 2020
Points
128
Location
Portchester, Fareham
Model of Z
1998 BMW Z3 Individual 1.9 M44 B19
For your swaybar endlinks that looks canted, I have this same problem when I replaced mine (Meyle). I drove around with the new end links and the passenger side endlink wants to come off the swaybar (it's barely attached to the swaybar).

I examined the old OEM endlink, I can see (overtime) the endlink bushing (the hole that the swaybar goes through) deformed into an offset.

I suspect the new endlink bushings need to deform to get the correct angles you need. The bushing where the swaybar end goes through is the one that needs to have the greatest deformation to lineup properly.
thanks mate.....that's really interesting, almost like the links need to "settle".... glad I'm not going mad then !
 

Matt Barnes

Zorg Guru (III)
Supporter
British Zeds
Joined
Jul 18, 2020
Points
128
Location
Portchester, Fareham
Model of Z
1998 BMW Z3 Individual 1.9 M44 B19
Well...........big day today... today is one of those "It's the first time in 2 years since..." posts...... and I'll advise you of some glaring errors I conducted along the way.....so... I thought "wouldn't it be good to get the heat shields on with the lovely zinc plated fasteners"..... enter error No.1

1754748647815.png

1754748687077.png


All going swimmingly well...... and the subtle hint of what's wrong is laying on the floor........... :whistle: :whistle: ...

so after wrestling it over the exhaust and keeping the propshaft out the way...I then had to take it off............ ok.. this time let's put the tank in first shall we ?

It was a bit of a faff getting it over the propshaft whilst lining the filler neck up through the hole, but once I got the angles right... it slid straight in. I loosely connected the shiniest tank bolt.... ever...
1754748988204.png


In order to offer up @Mazza s tank straps.... got one in fine but the other one just wouldn't bed in.... then I realised I hadn't checked the top vent pipes. Loosened the tank and pulled it down to see the blue vent pipes weren't clipped in..... :whistle::whistle:

with that now done, the tank straps slid in lovely...

1754749176572.png

1754749209081.png


and yes I even remembered the earth strap ! :party:

1754749272855.png


THEN .... I could put the centre heat shield back on .. connect up the vent line and fuel lines with double ear fuel line clips

1754749412831.png

1754749432058.png


now then... for the rear heat shield, the holes had blown through so I had to get creative..... :whistle:

1754749529731.png


Now stick with me here.....

I got a old tube of disinfectant cream and cut it into three parts.....

1754749606270.png


Cleaned it all, folded each part over on itself, glued the inside and pressed it in a vice.. this gave me then a strong(ish) metal patch.... which I then glued over each damaged hole.

1754749725035.png
1754749749653.png


and this is the front side with new hole...
1754749792751.png


and now back in place nice and secure

1754749839881.png
1754749975730.png


I also let the car see it's missing subframe for a little chat for the first time in two years ! :party:

1754749933326.png


There's bit more to do underneath before I even attempt the subframe.... including lowering the car back down to a manageable height....
 

Attachments

Last edited:

Mint

Zorg Expert (I)
Supporter
British Zeds
East Anglian Crew
Joined
Sep 23, 2012
Points
222
Location
Stafford
Model of Z
2.2 Sport Individual
Good progress Matt, it's so shiny under there you won't want to drive it. You'll be eating your dinner of it :thumbsup:=))
 
Top