Z3(00S) - EV project
- Thread starter Tom Cheesewright
- Start date
-
- Tags
- electric car
It has been a while since my last update. My inverter control board was off getting repaired, the cold weather, rain and snow made outdoor work either unsafe or unappealing, and right up until the break I was buried with work. But getting there again now.
With everything else ruled out I decided to focus on my battery pack and charging. If you've been following this build blog you'll know I had SimpBMS running on a Teensy 3.2 to manage the batteries (5 cells from a BMW 330e hybrid) and a 3.7kw charger from a Mitsubishi Outlander PHEV (same as my motor). Since the last update I picked up a cheap Pod Point Type 1 charging point (£60 from Facebook) which doesn't have huge capacity but matches the charger. I had planned to modify the BMS (battery management system) software to control the charging but this required a bit more work than I realised. So in the short term I decided to experiment with a sketch for the Arduino Due shared by one of the OpenInverter forum members also playing with the Outlander charger.
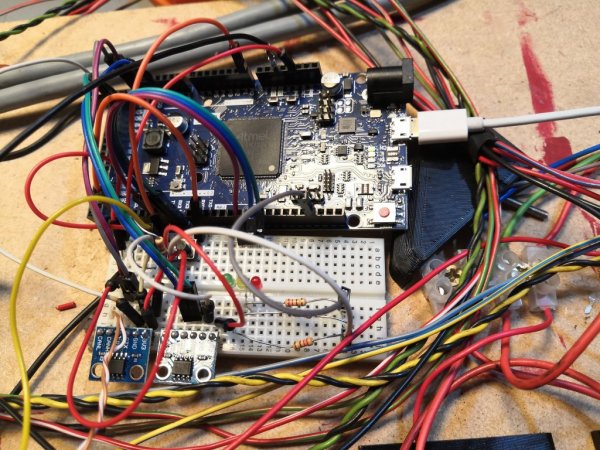
This sketch has three inputs and one output. It pulls information from the charger over CAN about the battery voltage, AC etc. It connects to the PP (proximity pilot) pin of the charging port via a voltage divider. And it has a push button.
The charger itself connects to the other signalling pin from the charging port (I picked one of these up, also from an Outlander). When you plug in the charger, the Arduino sketch recognises that is plugged in and sends messages over CAN to the charger to tell it to start charging, and sets a target voltage.
I had a bunch of problems getting this all working. My charging handle had a lower resistance on the PP line than the person who wrote the sketch, so pulled the input pin to a level where the sketch went into an error state. The CAN transceiver I used received messages fine but refused to send them - I had to swap it out. But after some messing around there were some satisfying relay clunks and the system started charging.
I then started to look at the BMS and had to work out how to put it manually into the mode where it would monitor charging. There is a digital input for this which puts the sketch into the right state when pulled high, so it was just a question of identifying this from the code (pin 18 in this case).
With the BMS in charging mode I could monitor the voltage on my battery slowly climbing - I was limiting charging current to 1A out of a maximum of 15 since I didn't have any cooling hooked up to the charger or the batteries.
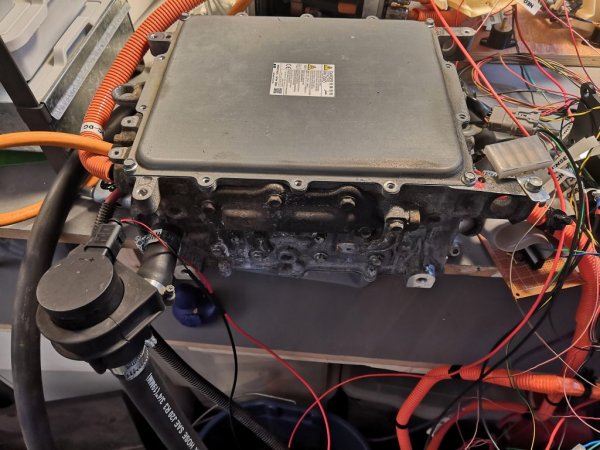
After a while the charger did get a little warm but everything was clearly working so I turned it off until I could add some cooling in. The batteries seemed to be absolutely fine so I just added a pump and a bucket of water to the charger for now. After an initial small leak, this worked fine with some tightened hose clamps.
The bigger challenge now is coding for the BMS since I don't want to add yet another chip into the system to control the charging. I have two spare pins on the connector that goes into the battery box. I'll need a way to turn the BMS on and flip it into the appropriate mode so that it can begin charging and monitor it. And I'll also need to get the external CAN interface working on it - something another forum member is kindly helping me with.
For now it's going to be more indoor work so that is a sensible goal for a January that looks to be pretty packed workwise. Though I did get contributions towards some new tools for Christmas and have invested in some things that should make (finally) getting the rear subframe out and fixing the rusted spring mounts. Hello 18V angle grinder & impact wrench...
Other stuff
Writing these posts is always good for reminding me that while I don't think I've done a lot, I actually have. Since the last post I have also:
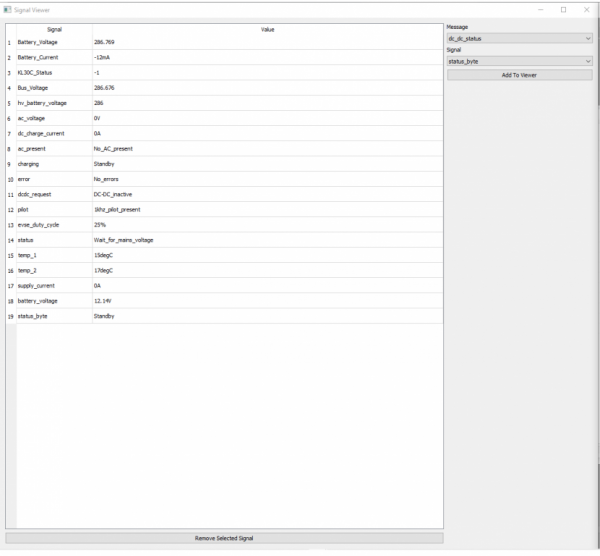
- Learned how to use SavvyCan to monitor and interpret CAN bus traffic, including writing my own DBC files - effectively little translators that turn the incomprehensible hex values includes in CAN messages into nicely marked-up signal readings like 'Battery Voltage' - see screenshot below for an example
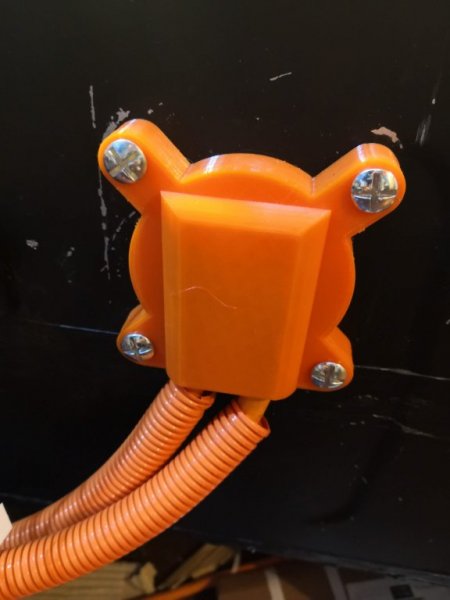
- Redesigned and reprinted the battery box connector to make it much simpler and more robust - see image below
- Finished modifying the S-Box and all the relevant wiring from the BMW hybrid battery pack to replace my rather large and unwieldy (and expensive) high voltage junction box. No great loss as this can be used in future projects, but I could have shaved a few hundred quid off the cost of this project if I had done this first. Since this can sit inside the battery box, this also creates the space I needed to mount the charger under the bonnet.
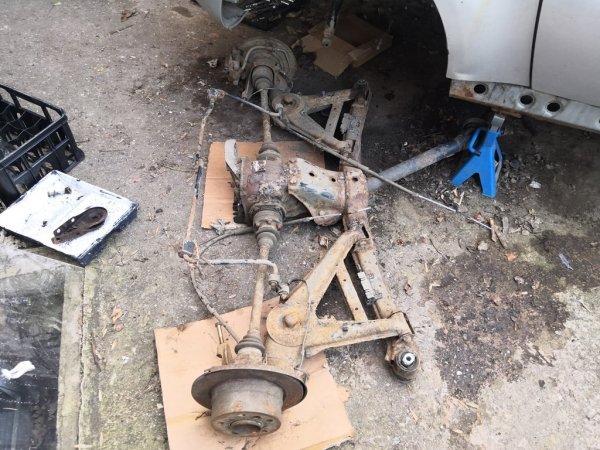
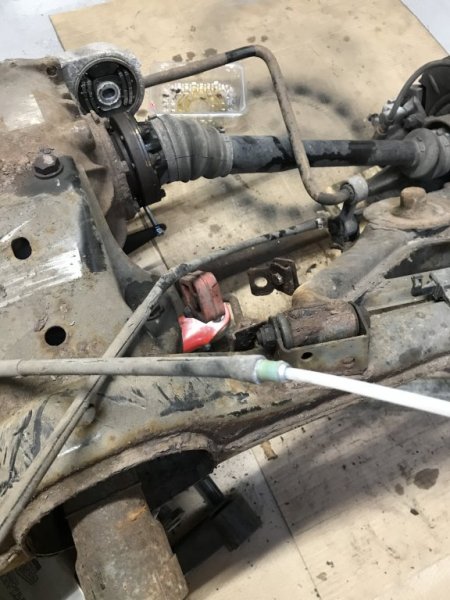
- Made some progress removing the rear subframe. All the brake lines had to be cut because the unions were completely seized but the handbrake cables are now out and I'm down to three very crusty allen-head bolts that don't want to move. They have been repeatedly soaked in WD-40 and cleaned with a wire brush. Next step when it's a bit drier and warmer is a few smacks with the hammer and maybe an assault with the new impact wrench.
Attachments
-
43.6 KB Views: 86
-
236.2 KB Views: 87
-
165.4 KB Views: 87
-
203.3 KB Views: 95
Some tips for getting Allen bolts out
1. Always have a spare bit of the correct size, amazing how many snap just before the last bolt.
2. Give the bit holder a really good few smacks with a hammer before you attemput to remove it.
3. If the inside rounds, or, is already chewed up, smack a splined bit in. Consider the splines/torx bit sacrificial, seldom get it back in one piece.
4. If it's really toast, clean it up as best you can, pop a nut over the top and weld together. The heat will usually get it loose.
Also works well for bleed nipples.
Thanks Iain. Hoping to avoid the welder or any heat given proximity to the fuel tank and severed fuel lines, even if the tank is drained and the fuel lines clamped. But the hammer is definitely going to see some service and I fear I will have to at least sacrifice a splined bit on one of them. We shall see when time and weather permit. Really should have done this job in the summer!
Another option for removing rounded Allen bolts is this tool from Irwin, Tom. (there are other brands out there now but these were the first I came across).

Tony.

Irwin 10504634 Bolt-Grip Fastener Remover Base Set for Damaged/Rounded Nuts | eBay
Bolt grip for removing rounded, rusty or painted bolts. Can be used with a hand ratchet 3/8 in square drive and has hexagon flats for use with a spanner or adjustable wrench. This set is supplied in a storage case.
www.ebay.co.uk
Tony.
I quite like those for standard hex Tony, any time I've used them on Allen bolts I've ended up with a mess. Probably more the poor quality of the (usually) Japanese fasteners.
Tom, if you have to revert to to the welder, screen the pipes/tank as much as possible, carboard/plastic anything really, and turn the gas right up. I typically used 20-25 litres and run it a bit hot. If your welder has a progressive trigger where you can get a some gas that's a help.
I do love this thread, can't follow more than a wee bitty of it, BUT, having looked at that Outlander motor fitted to a rear diff, you have me wondering about fitting one to the Suzuki convertible I have on stands in the garage.
I quite like those for standard hex Tony, any time I've used them on Allen bolts I've ended up with a mess. Probably more the poor quality of the (usually) Japanese fasteners.
I used these quite often for undoing the Allen bolts which VAG insist (still) on using to fit water pump pulleys etc. Never had a problem but you do have to “tap” them on first.
Tony.
I used these quite often for undoing the Allen bolts which VAG insist (still) on using to fit water pump pulleys etc. Never had a problem but you do have to “tap” them on first.
Tony.
About 12 years ago the start-up I co-founded joined an accelerator programme. One of my takeaways from my time spent there (I was still running another business) was the phrase "JFDI", short for "Just f***ing do it." I think it is fair to say I have reached the JFDI stage on this project.
In April we are getting a load of building work done. This building work starts in the place I have currently stored a bunch of the body parts stripped from the car: bumper, wheel arch liners, etc. I need to clear this area, which means I need to have the car reassembled by April.
Fortunately, there has been progress while I've been quiet on the blogging front. That was for all the usual reasons: work, family, despair at the lack of variety in my life under lockdown. Mainly work though: thankfully that has been good, keeping me busy but funding this adventure.
Which leads me neatly to a confession: I have rather lost track of spending on this project. Or rather I had. What started as a passion project, and an educational project for my daughter, has become increasingly closely aligned with my work. In fact, it has helped me win some very interesting business. As a result my accountant advised me that my investments would constitute a legitimate business expense. Which was great, until he told me how much I had spent...
For now, let's just say that it is more than I imagined. When I'm done, I shall publish a budget based on what it would cost to replicate my project. But I shall say now that I might not be brave enough to share what I've actually spent. Though thankfully, I can say that the business it has helped to bring in more than covers the costs.
Anyway, back to JFDI. What has happened in the last two months?
Then there is some refurbishment to do. I have bought kits to refurb both sets of brakes. I could probably do with new bearings but those can wait for now. The rear subframe needs a really good clean and a coat of paint. And all the brake lines need redoing.
Both sides of the rear spring mounts still need welding up - once that fuel tank is out - and there is a little repair welding to do at the front right corner. Then there are some brackets to weld in for the power steering pump - one is in and the other two are made and in primer.
Then it can all go back together. All of that. In a month. When I'm flat out with work. The only option? JFDI.
In April we are getting a load of building work done. This building work starts in the place I have currently stored a bunch of the body parts stripped from the car: bumper, wheel arch liners, etc. I need to clear this area, which means I need to have the car reassembled by April.
Fortunately, there has been progress while I've been quiet on the blogging front. That was for all the usual reasons: work, family, despair at the lack of variety in my life under lockdown. Mainly work though: thankfully that has been good, keeping me busy but funding this adventure.
Which leads me neatly to a confession: I have rather lost track of spending on this project. Or rather I had. What started as a passion project, and an educational project for my daughter, has become increasingly closely aligned with my work. In fact, it has helped me win some very interesting business. As a result my accountant advised me that my investments would constitute a legitimate business expense. Which was great, until he told me how much I had spent...
For now, let's just say that it is more than I imagined. When I'm done, I shall publish a budget based on what it would cost to replicate my project. But I shall say now that I might not be brave enough to share what I've actually spent. Though thankfully, I can say that the business it has helped to bring in more than covers the costs.
Anyway, back to JFDI. What has happened in the last two months?
- I've got the inverter board fixed after a few attempts and my inverter now seems to be working fine (this one sentence hides a lot of pain)
- I've overcome some issues with the resolver, which works out the position of the motor rotor (this sentence hides hours of swearing)
- I have my charger mostly working (ditto)
- I've made almost no progress removing the rear subframe... (Malcolm Tucker would blush at the swearing involved here)
Then there is some refurbishment to do. I have bought kits to refurb both sets of brakes. I could probably do with new bearings but those can wait for now. The rear subframe needs a really good clean and a coat of paint. And all the brake lines need redoing.
Both sides of the rear spring mounts still need welding up - once that fuel tank is out - and there is a little repair welding to do at the front right corner. Then there are some brackets to weld in for the power steering pump - one is in and the other two are made and in primer.
Then it can all go back together. All of that. In a month. When I'm flat out with work. The only option? JFDI.
Awesome stuff, sounds like you are working more on the mechanicals of the car now rather than the electrification components? That must be a good sign.
I've been following 'electric classic cars' company after their recent TV series and they make all this look so easy! I guess its not which is why they also charge 50k a car!
I've been following 'electric classic cars' company after their recent TV series and they make all this look so easy! I guess its not which is why they also charge 50k a car!
Only problem with doing a first is the developmental cost that should be a saving for someone else in the future. Looking forward to see your project running.
About 12 years ago the start-up I co-founded joined an accelerator programme. One of my takeaways from my time spent there (I was still running another business) was the phrase "JFDI", short for "Just f***ing do it." I think it is fair to say I have reached the JFDI stage on this project.
In April we are getting a load of building work done. This building work starts in the place I have currently stored a bunch of the body parts stripped from the car: bumper, wheel arch liners, etc. I need to clear this area, which means I need to have the car reassembled by April.
Fortunately, there has been progress while I've been quiet on the blogging front. That was for all the usual reasons: work, family, despair at the lack of variety in my life under lockdown. Mainly work though: thankfully that has been good, keeping me busy but funding this adventure.
Which leads me neatly to a confession: I have rather lost track of spending on this project. Or rather I had. What started as a passion project, and an educational project for my daughter, has become increasingly closely aligned with my work. In fact, it has helped me win some very interesting business. As a result my accountant advised me that my investments would constitute a legitimate business expense. Which was great, until he told me how much I had spent...
For now, let's just say that it is more than I imagined. When I'm done, I shall publish a budget based on what it would cost to replicate my project. But I shall say now that I might not be brave enough to share what I've actually spent. Though thankfully, I can say that the business it has helped to bring in more than covers the costs.
Anyway, back to JFDI. What has happened in the last two months?
And this is the real JFDI moment: this weekend, without fail, I will get those stuck bolts out. My epoxy-based scheme failed. Miserably. So I have filled the fuel tank with water. And I will be getting the welder out, to weld on some hex studs I can use to spin them off. With luck, the heat will also help to free them.
- I've got the inverter board fixed after a few attempts and my inverter now seems to be working fine (this one sentence hides a lot of pain)
- I've overcome some issues with the resolver, which works out the position of the motor rotor (this sentence hides hours of swearing)
- I have my charger mostly working (ditto)
- I've made almost no progress removing the rear subframe... (Malcolm Tucker would blush at the swearing involved here)
Then there is some refurbishment to do. I have bought kits to refurb both sets of brakes. I could probably do with new bearings but those can wait for now. The rear subframe needs a really good clean and a coat of paint. And all the brake lines need redoing.
Keep the faith and JFDI !
good luck getting those Allen bolts out, as you say the heat should help, plumbers freeze spray has helped me on a few occasions too.
You probably know already, but if you’re replacing the brake backplates you’ll have to do the bearings anyway. Good luck with it all.
Ha! Yep. I've been doing the maths on making this a commercial thing (not seriously, just for fun) and once you factor in the hours for a one-off it gets very expensive.Awesome stuff, sounds like you are working more on the mechanicals of the car now rather than the electrification components? That must be a good sign.
I've been following 'electric classic cars' company after their recent TV series and they make all this look so easy! I guess its not which is why they also charge 50k a car!
However, if you templated a couple of models and did them in small batches, the costs would come right down. At some point I will draw up all my steelwork in Fusion and share the files for anyone else who wants to do a Z3. Even if they chose a different motor it would save them a lot of time.
Absolutely but per my previous reply, I'll try to share as much as I can so that if others want to do a similar conversion in future, they can learn from my (many) mistakes.Only problem with doing a first is the developmental cost that should be a saving for someone else in the future. Looking forward to see your project running.
No such thing as many mistakes  Research and Development
 Research and Development
Yesterday: JFDI
Today: Just f**kin' did it.
Three drill bits, two different bolt extractor tools, two blow torches, an angle grinder, a hammer, a power drill, and an impact wrench. Oh, and a lot of swearing. But I got there.
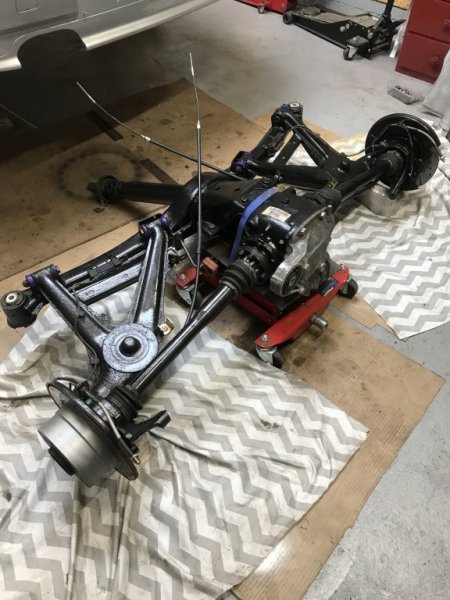
Needs a good clean but despite all the crust, I don't think there's anything structurally wrong. Not liking the prices of new bushes though.
Attachments
-
243.7 KB Views: 93
Doesn’t look too bad, taken a couple out that look similar and they clean up ok. Keep the faith!
Attachments
-
100.5 KB Views: 103
-
107.8 KB Views: 92
Amazing! Don't think I'll achieve quite that level of finish but I'll have a good go.Doesn’t look too bad, taken a couple out that look similar and they clean up ok. Keep the faith!
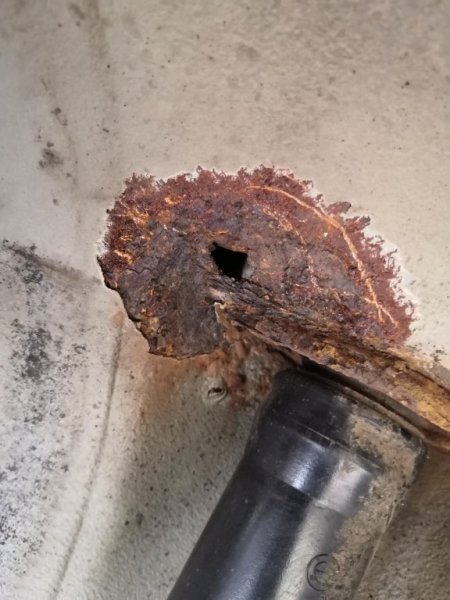
Uh-oh. More rust.
Does anyone have any experience replacing rear strut towers? And when I say replacing...
Does anyone have any experience replacing rear strut towers? And when I say replacing...
Attachments
-
86.9 KB Views: 93
Believe it or not, that’s not bad.
son and I have done a couple of Mini, bits of those were quite terrifying.
There are 3 ways of piecing metal in
Butt welding. Just don’t, it’s not for beginners
Putting a flange in the panel and letting metal in. Not as easy as it sounds.
Putting a flange in the repair panel and welding it in. The most fiddly, but by far the easiest.
back in a minute, a cat is demanding to be fed.
Little monster clearly couldn’t catch a rabbit tonight.
Right Tom, attack that with a wire brush or a flap disc to get to wherever decent metal is. Mark with a sharpie, overlay a piece of baking paper, it’s semi transparent, mark the paper. Now you need a flanger/edge setting tool/joggler.
Find out what depth the tool puts the flange with a piece of scrap metal.
Subtract 3mm from that depth and add it to the baking paper pattern. Lay it on a piece of steel and cut it out. Now, flange it, so that the flange goes on the INSIDE. Fiddly to get in place. And you’re now thinking “bugger, that’s too small, there’s a big step”. No it’s not, the step is where you’re going to weld, that makes it almost invisible with just a quick touch of a flap disc. You can rivet it in place, use magnets, but the best are Cleco pins, temporary rivets.
I can lend you that stuff.
If the rust goes under the return I’d do that in two pieces, bending a curve is difficult, welding it from two pieces is easy.

